

How to Make DIY Washi Tape Resin Coasters
Scroll

DIY washi tape resin coasters are a gorgeous resin craft that can range in style from something fun and fantastical to something stylish and sophisticated. Using layers of resin and decorative washi tape, this project contains visual elements reminiscent of the Japanese art of kintsugi. Although kintsugi typically involves working with pottery, we can apply some of these visual techniques to a variety of resin projects.
Tools You Will Need:
- Promise Table Top Epoxy
- Gloves
- Safety goggles
- Measuring and mixing cups
- X-Acto knife
- Stir sticks
- Mica powder of your choice (we chose hues of gold, pink, and fuschia) - we love Black Diamond Pigments!
- Glitters of your choice - these color changing glitters are amazing!
- Coaster molds
- Washi tape
- Water-based paint outliner (gold)
- Popsicle sticks
1. Gather Your Supplies
Gather your supplies and set them up nearby. You’ll want to work in a well-ventilated area with a stable temperature of around 68–74 degrees Fahrenheit.
Don’t forget to put on the appropriate safety gear before working with resin. The epoxy we’ll use in particular is our Table Top Epoxy Resin, which is measured by volume in a 1:1 ratio.
2. Mix & Add Color
Stir the two parts together for several minutes using a folding motion. Once they’re combined, separate the resin into different cups. Use one cup for each color you plan to use, including one for clear resin. Add your mica powders in small quantities until you achieve your desired hue.
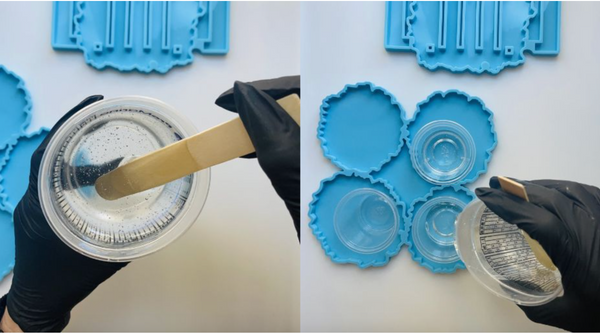
3. Pour & Blend
Pour your first color (ours was gold pink) around the edges of your mold. Next, take the second color (red plum) and pour it into a circle, leaving the center of the mold empty. Lastly, pour your final color (fuchsia) into the center of the mold. Don’t fill the mold to the very top, as you’ll be applying a topcoat later.
With a toothpick or something similar, blend the colors together to create interesting patterns in the resin. Once you like the pattern you’ve created, allow the coasters to cure by placing them in an environment free of dust or debris for around 24 hours or until they’re tack-free.

4. Time To Decorate
Take a strip of your chosen washi tape and stretch it across the cured surface of each coaster. You can use an X-Acto knife to trim the edges of the tape. Once you’ve applied washi tape to every coaster, take out the gold paint outliner and use it to outline the strip of washi tape on each coaster.
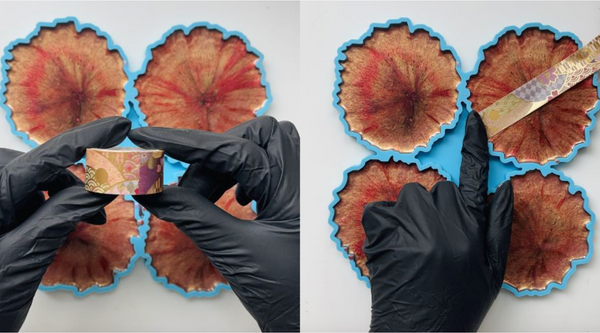
Next, use the outliner to create separate sections by drawing lines from the edge of the coaster to the washi tape at the center. These lines are reminiscent of the Japanese art of kintsugi.
Then, you can create one or more glitter-resin mixtures to fill in the sections. Follow the previous instructions for combining your two-part resin, and separate it into smaller cups. Add the glitter to the cup(s) and mix it into the resin.
Use a tool, such as a popsicle stick, to ladle the mixture(s) into different sections, according to what you prefer. We used multiple glitter-resin color combinations to fill in some of the outlined sections. Then let the coasters cure for 3-4 additional hours.
5. Apply A Topcoat
Once the coasters have cured, mix up a final batch of clear Table Top Epoxy Resin to serve as a topcoat. Pour the clear resin over the top of each coaster to cover the surface and allow the coasters to cure. Coasters that may come into contact with food should be cured for 5–7 days to achieve FDA compliance.
After the final curing period, your washi tape coasters are done.
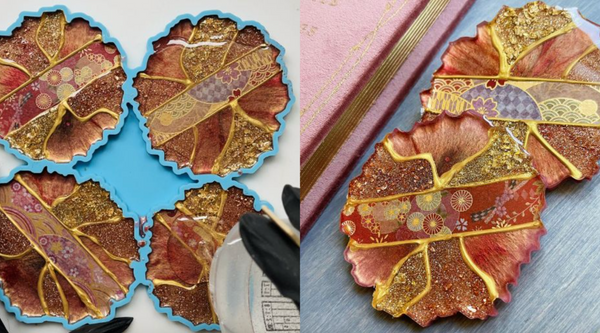
6. Demold!
After a full 24 hours your washi tape coasters are ready to demold. Go ahead and peel away the silicone mold and remove your coasters.
What do you think about this technique? Combining two different kinds of crafting/DIY elements makes for the creation of even more gorgeous one-of-a-kind possibilities. On top of that, there are a variety of beautiful craft and washi tapes that you can incorporate.
Have you ever created with washi tape and resin? Share your projects with us on our social media.
Happy making!